Project 3 (Extra project)
Project 3: Character Modeling (Extra Project)
For this project is optional as I had extra time since Mr Kamal extended the due date thus, I tried to make my initial model of my first idea as I enjoyed doing character modelling.
The character model I decided to is Boo from Monster Inc.
Reference photo:

Figure 1: Reference Model
Modeling Phase
1) Head
I started out by adding spheres for the eyes and shaping the head following the reference model with extrusion aswell as the neck. For the ears I also used a sphere object and then to make the ears a bit more realistic I also used the sculpting tool to add definition. I did the same thing for the nose and lips by using the sculpting tool. Putting subdivision surface to also smoothen out the model.

Figure 1: Base of the head
And then I move the eyes inwards to make the eye sockets later on by giving the base shape of the eyes first.

Figure 2: Eye shape
Next, I made the eye sockets by making the vertices around the eye area more gradually inwards to make the eyes area look more hollow and realistic.

Figure 2: Eye sockets

Figure 3: Adding hair base
I added hair by making from multiple long skinny cylinders and gradually make it thinner towards the end. Then I duplicate it many times to make hair thick as well as putting small skinny cylinder liked hairs on the tips of the hair to give messier hair and creating volume.

Figure 4: Adding hair strands
I extruded the mouth inwards to give the hollow shape and bevelling the edges to smoothen out the whole mouth. I also beveled the chin area to give a slight curve look.

Figure 5: Adding mouth
2) Body
After completing the head, I start to progress on the rest of the body. I start out adding the cylindrical shape on each part. Loop cutting 3 times and extruding the edges inwards. I also smoothen the shape and add subdivision surface so the whole body looks natural. For the top part I added another cylinder shape to make the neck part of the body.

Figure 6: Base of body
This is what it looks like after smoothing each of the shape of the body.

Figure 7: Smoothing body
As the neck part of the body is more defined thus I loop cut 4 times and moving edges inwards like I did previously to give the lines more depth. Also bevelling the edges so it looks slight round. I adjusted the second line of the body to give a curvier line following the reference model.

Figure 8: Neck part of the body

Figure 9: Adding head part of body
Adding the teeth of the body by simply adding small oval shapes in different sizes and placing it on the edge of the body.

Figure 10: Adding teeth to the body
This is what it looks like by adding all the teeth on the body in following the reference model.

Figure 11: Adding all teeth
I added a long cylindrical shape and sphere shape for the eyes of the body and adjusting the shape of the cylinder for the eyes for the eye sockets.

Figure 12: Adding eyes
Then adding the hands by simply extruding the shape of a circle and following the reference model.

Figure 13: Adding hands
This is what it looks like by adding both hands and having done the modelling phase.

Figure 14: Adding both hands
Texturing Phase
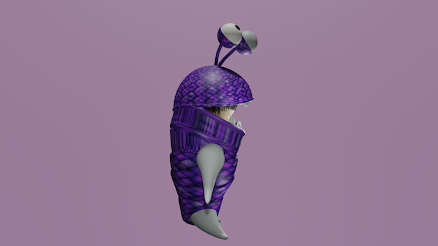
I used a purple fish scale as the skin texture and applied on the body using the image texture. The hands I used a white texture along with eyes of the body.

Figure 15: Adding texture to body
This is the reference image I used for the skin texture. I unwrap the body and scale it bigger to the model so the scale looks smaller on the body and can be seen.

Figure 16: Seamless skin texture
For the eyes, I added another spherical shape on the eyes and used an eye image as the skin texture.

Figure 17: Adding sphere shape
I unwrap the UV and then adding the image texture following the closest shape to the eye.

Figure 18: UV unwrapping
This is the reference image I used for the eyes and scaling the size bigger so it fits the shape of the sphere to follow the image texture.

Figure 19: Eye image texture
Lighting Phase
I added multiple sun, spot and point lights in the right place so that the model looks brighter and visible on camera for rendering. These are the lights I place in their directions to give the correct lighting to model.
I added multiple sun, spot and point lights in the right place so that the model looks brighter and visible on camera for rendering. These are the lights I place in their directions to give the correct lighting to model.

Figure 20: Adding lighting
Final Result
1) Front facing view


2) Side facing view

3) Back facing view


Comments
Post a Comment